| View previous topic :: View next topic |
| Author |
Message |
windbag
Junior Member
Joined: 17 Sep 2013
Posts: 3
|
 Posted: Sat Sep 28, 2013 1:28 pm Post subject: Thicknessing ribs with jointer or planer Posted: Sat Sep 28, 2013 1:28 pm Post subject: Thicknessing ribs with jointer or planer |
 |
|
This is my first post and I am about to start (hopefully) my first violin. I ordered some wood and the ribs arrived at 5mm thickness. I read that the ideal thickness should be 1.2 mm. I own both a jointer and a planer. I am wondering if it is wise to put a non slip surface between the 5mm maple ribs and a piece of scrap and try to use the jointer to bring the thickness down to 2mm. After that use a scraper to get the final thickness.
Any words of advice?
thanks
Randy |
|
| Back to top |
|
 |
Chet Bishop
Super Member

Joined: 23 Mar 2007
Posts: 678
Location: Forest Grove, Oregon
|
| Posted: Sat Sep 28, 2013 2:28 pm Post subject: |
|
|
Quite honestly, that sounds (a) dangerous, and (b) like a good way to ruin the rib, especially highly figured wood.
I do use an oscillating spindle sander to "pre-thickness" my ribs, after cutting them out on the bandsaw (sorry, to all you "no-power-tools" adherents), and get them within 0.1-0.2mm of my goal (BTW, I want mine at 1.0mm), then finish with a scraper, to get the sanding marks out.
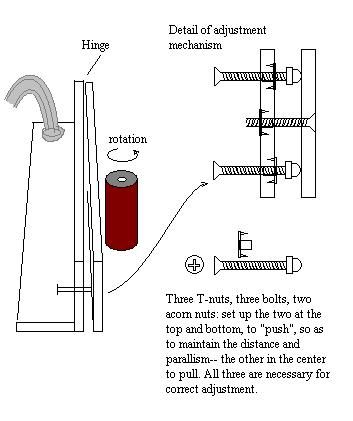
I made a fixture to clamp on my spindle sander, that allows me to make minute adjustments to thickness as I work, and it does the job pretty well. Here is the fixture (bitmap sketch):
When I make a cello or bass, I have to resort to a larger tool. My son has an abrasive thickness-planer, 24" wide, and it works well for that.
_________________
Chet Bishop
https://bluefiddles.com
https://fivestringfiddles.com |
|
| Back to top |
|
|
kjb
Super Member
Joined: 06 Feb 2013
Posts: 385
|
| Posted: Sat Sep 28, 2013 5:51 pm Post subject: |
|
|
definitely not either as chet says
if you can find a friend with a thickness sander that works very well.
not sure where you are from, but there may be workshops in the area that you could access.
I did my first one like that with just scrapers that were not all that sharp, it takes a loooooong time. good luck, you should have a lot of fun !! |
|
| Back to top |
|
|
Cliff Green
Member
Joined: 01 Apr 2007
Posts: 111
Location: Amissville, Virginia
|
| Posted: Sat Sep 28, 2013 8:43 pm Post subject: |
|
|
I agree with Chet and kjb. If you use a planer on wood thinner than 2 or 3 mm with any flame you will end up with splinters and will probably have tear out on thicker stock. You could use a block plane. If you find that your wood is chipping out try putting a steeper angle on the cutting edge so that it works more like a scraper. While the wood is thicker you could use double stick tape on a flat surface so you can plane the whole surface in a pass. Switch to a scraper when you get thin. Of course you will have to un stick to measure thickness.
Check out Michael Darnton's pictorial of making a viola at www.darntonviolins.com
I have a very nice Inca planer that leaves a no sanding surface and I have had success on figured maple running at an angle to the flames, but I would not try it on thinner stock. It works great for squaring up neck blocks and initial plate flattening. For ribs I have also used sanding drums on a drill press and that works well with many passes. A plane for me is faster if you have a very sharp blade and reasonable technique. |
|
| Back to top |
|
|
windbag
Junior Member
Joined: 17 Sep 2013
Posts: 3
|
| Posted: Sat Sep 28, 2013 10:38 pm Post subject: |
|
|
Thanks for all the replies. It looks like I will put the jointer on the backburner for a while
Randy |
|
| Back to top |
|
|
Chet Bishop
Super Member
Joined: 23 Mar 2007
Posts: 678
Location: Forest Grove, Oregon
|
| Posted: Sun Sep 29, 2013 1:45 am Post subject: |
|
|
If it matters, the jig I sketched above is very easy to build-- it is just three pieces of plywood, one hinge, and three bolts, essentially. You could easily build it in an hour. I didn't show it in the sketch, but you might add some bracing to maintain the 90 degree relationship between the horizontal piece and the stationary upright piece.
You clamp the one horizontal piece to the table of the spindle sander (or a drum-sander on a drill press), and adjust the hinged piece to the desired clearance from the drum.
Run a pass to check, and use calipers of some sort to see what effect you had. Then tighten the bolts just a little and have another go at it. Eventually you learn just about what fraction of a turn on the bolts makes what fraction of a millimeter change in the thickness of the ribs. After that it is smooth sailing.
_________________
Chet Bishop
https://bluefiddles.com
https://fivestringfiddles.com
Last edited by Chet Bishop on Thu Oct 03, 2013 9:10 am; edited 1 time in total |
|
| Back to top |
|
|
Cliff Green
Member
Joined: 01 Apr 2007
Posts: 111
Location: Amissville, Virginia
|
| Posted: Sun Sep 29, 2013 1:52 pm Post subject: |
|
|
Chet
I like your jig. When I tried drum sanding I used a piece of square stock as a fence clamped to the table and beat on it for setting the thickness. Your method is much more elegant.
Do you have any problem with the oscillating sander being square to the table or run out on the spindle? |
|
| Back to top |
|
|
Chet Bishop
Super Member
Joined: 23 Mar 2007
Posts: 678
Location: Forest Grove, Oregon
|
| Posted: Mon Sep 30, 2013 9:24 am Post subject: |
|
|
Well, originally I was worried about that, and checked for square over and over. I finally realized that it was always square, and quit checking.
The jig is much more likely to flex than the sanding spindle is, so I simply use a vernier caliper to chack the thickness of the ribs as I process them, and turn them frequently, to make sure they have been sanded on each side, and from each edge, to avoid any possible wane or taper being established.
I've been pretty happy with it.
_________________
Chet Bishop
https://bluefiddles.com
https://fivestringfiddles.com |
|
| Back to top |
|
|
kjb
Super Member
Joined: 06 Feb 2013
Posts: 385
|
| Posted: Tue Oct 01, 2013 9:26 am Post subject: |
|
|
| how thin do you make them before you go to the scraper? |
|
| Back to top |
|
|
Chet Bishop
Super Member
Joined: 23 Mar 2007
Posts: 678
Location: Forest Grove, Oregon
|
| Posted: Tue Oct 01, 2013 1:55 pm Post subject: |
|
|
| kjb wrote: | | how thin do you make them before you go to the scraper? |
The ones I did yesterday, the scraping only removed less than 0.1mm. I left one at 1 mm, another at 1.15...no biggie. They are easier to bend if they are thinner, though...and I think it helps the sound as well. I usually try for 1mm exactly, when a rib is done. (for violins, obviously...)
_________________
Chet Bishop
https://bluefiddles.com
https://fivestringfiddles.com |
|
| Back to top |
|
|
actonern
Super Member
Joined: 15 Aug 2007
Posts: 444
|
| Posted: Wed Oct 02, 2013 8:34 am Post subject: |
|
|
Do you have a table saw?
It's more wasteful of material, but a properly set up blade will produce rib stock that needs very little additional finishing... |
|
| Back to top |
|
|
Chet Bishop
Super Member
Joined: 23 Mar 2007
Posts: 678
Location: Forest Grove, Oregon
|
| Posted: Wed Oct 02, 2013 3:48 pm Post subject: |
|
|
I'm not sure who you were asking...but no, I don't have one. My son's table saw does what you say, but it does waste a lot of material. I use the bandsaw with the fence, and get good results.
_________________
Chet Bishop
https://bluefiddles.com
https://fivestringfiddles.com |
|
| Back to top |
|
|
actonern
Super Member
Joined: 15 Aug 2007
Posts: 444
|
| Posted: Wed Oct 02, 2013 5:04 pm Post subject: |
|
|
Sorry, not you Chet... the OP...
I agree, the table saw is more wasteful... |
|
| Back to top |
|
|
kubasa
Member
Joined: 13 Sep 2007
Posts: 212
|
| Posted: Wed Oct 02, 2013 9:44 pm Post subject: |
|
|
I'll be starting this process again. I'm probably sick in the head but I love planing ribs with a toothed blade. I'll have to maybe try the double stick tape so I don't have to rotate the wood around. That's a good idea!
James
 |
|
| Back to top |
|
|
shaunfosdick
Junior Member
Joined: 22 Jul 2013
Posts: 3
Location: saint louis
|
| Posted: Wed Oct 02, 2013 11:27 pm Post subject: |
|
|
| I have had good luck on the tablesaw with Diablo thin kerf circular saw blades, the 7 1/4" ones can just do a viola rib. It eats up just a little more stock than the bandsaw but needs very little cleanup. |
|
| Back to top |
|
|
|


