| View previous topic :: View next topic |
| Author |
Message |
Rick M
Member
Joined: 18 Sep 2016
Posts: 65
Location: Okotoks, AB, Canada
|
 Posted: Fri Jan 05, 2018 12:18 am Post subject: First Build (amateur), based on Plowden poster Posted: Fri Jan 05, 2018 12:18 am Post subject: First Build (amateur), based on Plowden poster |
 |
|
Since I've been lurking and gaining lots of information and insights, I thought it was time to take the plunge and put some of the work out there.
I picked the Plowden Strad poster in almost total ignorance, but the little bit of logic was that;
- I wanted to build a Guarneri, because it would be something that not everyone else was building (not a Strad)
- I liked the shape and the attributes in the review sounded like something that I'd like.
- And it was in Stock 
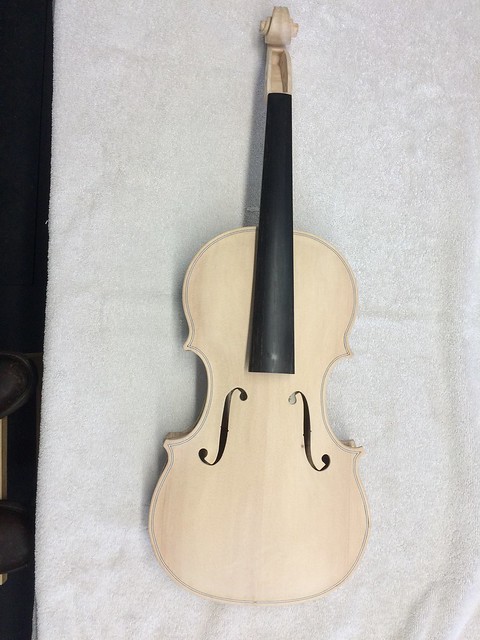
The wood is Sitka Spruce top, Big Leaf Maple back/sides/neck, Willow blocks and linings. The wood was sourced locally, shout out to Tyler @ Langdon Strings in Okotoks (formerly Grandpas Workshop). I've posted pictures of the back before with the water stains. A lot of the staining disappeared with carving and what's left is just character. Fittings (more to go obviously) from Lemuel.
Photos are in the white, it's further along, but I'm behind in my note making and organizing photos so.........
I think that the scroll is kind of crude and the corners......not very elegant. All of the discussion of getting corners right (and purfling, bee stings etc) is needed and more. (To quote Mat - no excuse for bad corners!!) Clearly more practice needed.
PS. The scroll and pegbox are straighter than they appear in the photo. I got a little distortion there somehow.
Having said all that, I'm fairly pleased so far, for a first effort.


 |
|
| Back to top |
|
 |
Rick M
Member
Joined: 18 Sep 2016
Posts: 65
Location: Okotoks, AB, Canada
|
| Posted: Fri Jan 05, 2018 12:31 am Post subject: |
|
|
A couple of acknowledgements too.
My main guide was Vojtech Blahouts' website- http://www.makingtheviolin.com/
Michael Darnton's - violinmag.com, plus all of the contributions here
Luis Manfio's tutorial on scroll carving (sorry Luis, next one will do more justice to your instruction!)
Davide Sora's terrific youtube channel
Plus numerous tips and tricks gleaned from all of the contributors here. It really is a great resource.
Chet Bishop - thicknessing using the sander/fence rig and numerous other
Craig - purfling and a couple of others
All those that I learned from and failed to mention, thanks! |
|
| Back to top |
|
|
kjb
Super Member
Joined: 06 Feb 2013
Posts: 385
|
| Posted: Sat Jan 06, 2018 8:46 am Post subject: |
|
|
| nice job! |
|
| Back to top |
|
|
ollieken
Super Member
Joined: 26 Mar 2007
Posts: 281
Location: New Brunswick Canada
|
| Posted: Sun Jan 07, 2018 12:19 pm Post subject: Rick |
|
|
| Hello Rick You have done a great job building hope my next one is near that good . Out of 2,444 you are the only one posting your work must be lonely at the top ... I Know I know where`s your work I but I just post ? ken |
|
| Back to top |
|
|
Rick M
Member
Joined: 18 Sep 2016
Posts: 65
Location: Okotoks, AB, Canada
|
| Posted: Sun Jan 07, 2018 12:33 pm Post subject: |
|
|

You, me, kjb and the crickets Ken! That’s alright though, some of the other places have SO MUCH commentary on every subject that it’s tough to glean much useful from it.
Maybe inspired by the note on Mr. Hayslett. He started in his 60s. That gives me hope as a “late bloomer.â€
I may kick the hornets nest shortly and put something out about grounds and varnish....... |
|
| Back to top |
|
|
Dave Chandler
Super Member
Joined: 31 Oct 2007
Posts: 691
Location: Mt Mitchell in North Carolina
|
| Posted: Thu Jan 11, 2018 4:23 pm Post subject: |
|
|
Just so you know, I too started late, about 56 or 57 , more than ten years ago. I've sold my last few instruments to professional players, so you truly can do it. I'm curious about your fingerboard projection and alignment, how did that come out? Before varnishing, that's the time you can correct anything you're not happy with. I've dislodged the neck and reset more than once, much easier with no varnish in the way.
Neck thickness is critical to players, first thing they notice. Might, before varnish, consider working the corners a little (look at the poster at those points).
Otherwise, great first effort. My first went into the fireplace, and you're is much nicer than my first.
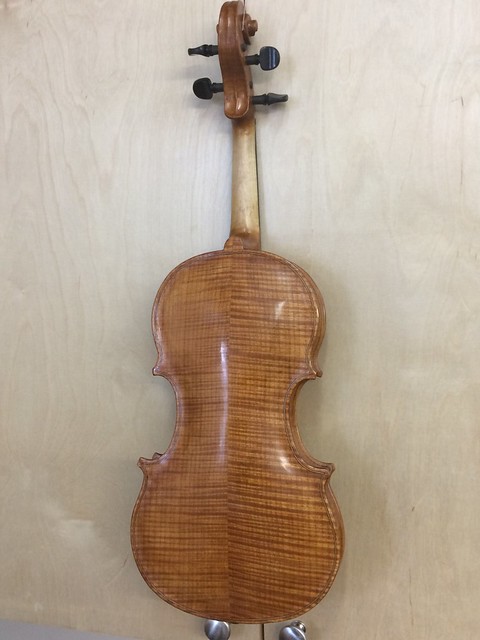
Back looks similalar to one of mine. It should come out pretty and distinctive.
_________________
Dave in the Blue Ridge
Southern Violin Association
"Success is the ability to go from one failure to the next with no loss of enthusiasm" Winston Churchill
"I took the road less travelled, and now I don't know where I am." Marco Polo |
|
| Back to top |
|
|
Rick M
Member
Joined: 18 Sep 2016
Posts: 65
Location: Okotoks, AB, Canada
|
| Posted: Thu Jan 11, 2018 10:20 pm Post subject: |
|
|
Dave, thanks for the comments and suggestions.
I'm pretty happy with the neck measurements - in the end. Alignment is good, overstand right. My height at the bridge appears to be a tiny bit (1/2mm or less) high.
Having said that, that was a .........3 day process. I did the mortise and chalk fit and got close, about 3-4 hours. Left it over night and spent another 3 or 4 hours working closer and closer. I had in mind the notion (from Michael Darnton maybe?) that you should be able to swing the thing over your head BEFORE gluing it up - or something to that effect.
I'd say that I could pick it up, but I wouldn't have swung it around
Then I gave all of the surfaces a thin coat of glue and let it sit over night again.
After some more chalk fitting I was concerned that I was going past optimum in the wrong direction, than improving anything. At that point glued it up. |
|
| Back to top |
|
|
Rick M
Member
Joined: 18 Sep 2016
Posts: 65
Location: Okotoks, AB, Canada
|
| Posted: Thu Jan 11, 2018 11:14 pm Post subject: |
|
|
Finish -
I mostly used an article from Michael Darnton as a guide with some experimentation along the way.
I settled on an oil varnish from Lee Valley, mostly for availability. Then tried a variety of shellacs as ground and artists colours to pigment the colour coats.

I ended up following Michael's formula of roofing asphalt and a touch of alazarin red for the colour coat
I even mixed up a small batch of Roger Hargreaves formula for a plaster ground and tried it out.
Left is plaster ground with coloured varnish, right is dark garnet shellac ground with coloured varnish

I went with the shellac ground.

 |
|
| Back to top |
|
|
Chet Bishop
Super Member

Joined: 23 Mar 2007
Posts: 678
Location: Forest Grove, Oregon
|
|
| Back to top |
|
|
Rick M
Member
Joined: 18 Sep 2016
Posts: 65
Location: Okotoks, AB, Canada
|
| Posted: Mon Jan 29, 2018 2:46 am Post subject: |
|
|
| Thanks Chet, appreciate the encouragement! |
|
| Back to top |
|
|
DonLeister
Moderator
Joined: 29 Mar 2007
Posts: 383
Location: Richmond, VA
|
| Posted: Mon Jan 29, 2018 9:05 pm Post subject: |
|
|
| Congrats on your first instrument! I admire you for wanting to make a violin and then actually doing it. |
|
| Back to top |
|
|
Rick M
Member
Joined: 18 Sep 2016
Posts: 65
Location: Okotoks, AB, Canada
|
| Posted: Mon Jan 29, 2018 10:35 pm Post subject: |
|
|
Thanks Don! Appreciate the kind words.
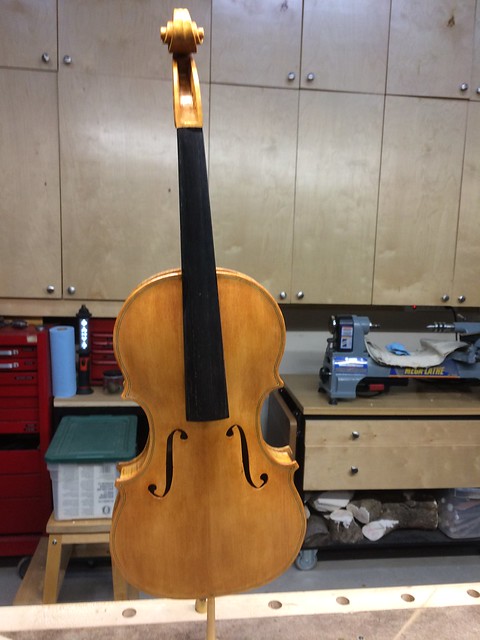
The picture below, is the end result of about 8 weeks of trial and error.
Of all of the processes involved in building, I was the least worried about the finishing. I had never done a finish exactly like this, but I brushed, sprayed, wiped and padded hundreds of projects using everything under the sun. Again, I'm pleased to discover that I still have LOTS to learn. My confidence is bruised, battered, and a little shaken, but I'm okay with the end result.
I did 2 or 3 colour coats, everything working fine. I did something that allowed for a little dust to infiltrate my drying setup, so I had to clean that up before continuing. I decided that I didn't want to wet sand with water, (for fear of cutting too deep and water staining the top I guess) so thought a little mineral oil would be the ticket. I polished up the top and back, wiped everything down and gave it another coat. All good, beautiful and smooth.
12 hours later, disaster.......it looked like I had poured syrup over the whole thing and let it set up!! Obviously I hadn't cleaned the oil off well enough. Sand again (with mineral spirits this time). Wipe down with mineral spirits and re-coat.
12 hours later, same thing......
I can only think that the mineral oil must have had an ingredient that caused the problem (like fisheye or something).
So sand back again, this time with turpentine. I didn't strip it, exactly but basically was starting from scratch. I did a couple of coats of shellac and started again with the varnish colour coats. Worked like a charm, but I don't recommend this as a varnish schedule!!
This photo is the ground, 5 colour coats, 2 clear coats. Wet buffed with linseed oil and gray scotchbrite, then polished with tripoli, again using linseed oil.
 |
|
| Back to top |
|
|
Rick M
Member
Joined: 18 Sep 2016
Posts: 65
Location: Okotoks, AB, Canada
|
| Posted: Mon Jan 29, 2018 10:41 pm Post subject: |
|
|
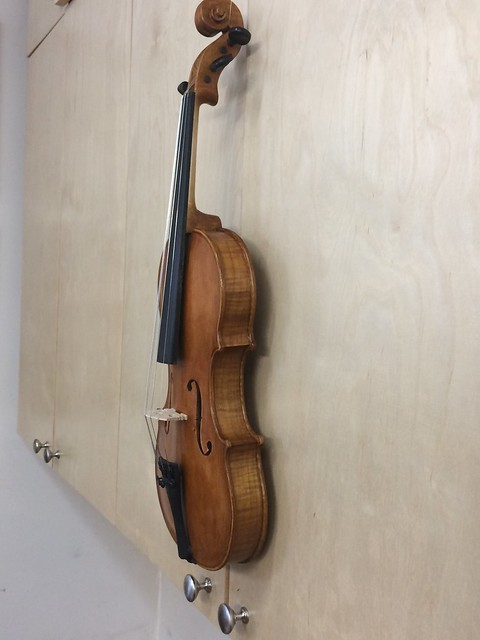
And, finally - strung up.
It sounds far better than I expected already and I know it takes weeks and months to settle in and learn that it's an instrument.
Thanks again to everyone that participates here and shares their knowledge and advice!

 |
|
| Back to top |
|
|
Chet Bishop
Super Member
Joined: 23 Mar 2007
Posts: 678
Location: Forest Grove, Oregon
|
|
| Back to top |
|
|
Mat Roop
Senior Member
Joined: 24 Mar 2007
Posts: 911
Location: Wyoming Ontario
|
| Posted: Sat Feb 03, 2018 8:51 pm Post subject: |
|
|
Good work Rick!... I'm impressed how well the stains on the back seemed to fade into the varnish.
... Now... send us a sound clip:) |
|
| Back to top |
|
|
|
|
You cannot post new topics in this forum
You cannot reply to topics in this forum
You cannot edit your posts in this forum
You cannot delete your posts in this forum
You cannot vote in polls in this forum
|
Powered by phpBB © 2001, 2005 phpBB Group
|

