| View previous topic :: View next topic |
| Author |
Message |
Wayland
Junior Member
Joined: 04 Aug 2017
Posts: 13
|
 Posted: Sun Aug 06, 2017 5:32 am Post subject: Unusual neck joint using wedges Posted: Sun Aug 06, 2017 5:32 am Post subject: Unusual neck joint using wedges |
 |
|
| I have an old fiddle, the neck is broken off taking some of the sides away with it. The unusual thing about it is that instead of the usual simple end glued into a block it has a complicated "T" shaped protrusion that is held onto the ribs (which run right across the button) with tiny wedges. This had to have been assembled before the top went on and there would be no way to remove the neck even with the top off as the ribs are sandwiched in the joint. As it was already broken off I soaked it in warm water and separated the pieces. I can't figure out how to add photos, I'm sure some of you would be interested to see this, I have not been able to find any mention of this joint anywhere that's why I joined this group. I'm not a Violin repairer, I just can't resist a challenge. Has anybody any ideas as to who, where or when this joint was used.[/img] |
|
| Back to top |
|
 |
rs
Member
Joined: 14 Jan 2009
Posts: 188
Location: Holland, Michigan
|
| Posted: Sun Aug 06, 2017 7:33 am Post subject: |
|
|
The one-piece neck appears to me to be a blip around the turn of the century (the one that saw the Wright Brothers, not that saw Segway scooters).
When I was younger, I was of the opinion that these were done to lower production costs and were a cheap line of violins. Many in the business today probably would say the same thing.
I have doubts on my previous conclusion now, however. I now think one-piece necks were a failed way to "improve" the modern neck as the Spanish Foot was done the same way on Classic guitars and was widely embraced.
Violin one-piece necks are hard to align, virtually impossible to get the angle correct and extremely complicated to remove. This is why I think people woke-up and saw them as a bad idea. But I might be wrong and the idea that these cut production costs might be the correct and simple answer. I have seen them on cheap violins, but also on violins that had everything else going for them from genuine bass bars (not integrated) to nice finish work. I do not recall seeing any that were made by one set of hands, though, only factory and shop violins.
I have a client who several years ago had a nice French violin from about that time period. It had a one-piece neck. He wanted the neck angle raised as the neck was low. I saw no option but to convert it to a mortised neck. He was happy with the results. I don't recommend going through all that trouble unless the neck is currently out of whack. But that is just me.
_________________
Randall Shenefelt |
|
| Back to top |
|
|
Wayland
Junior Member
Joined: 04 Aug 2017
Posts: 13
|
| Posted: Sun Aug 06, 2017 8:24 am Post subject: |
|
|
| Thanks rs, that was a quick reply! Now that I find that it's not an important piece I will try to join it the "normal " way. I wish I could have put some pictures on so people could see how intricate the joint is and what they will be up against if they ever come across one but I'm not good with computers. |
|
| Back to top |
|
|
rs
Member
Joined: 14 Jan 2009
Posts: 188
Location: Holland, Michigan
|
| Posted: Sun Aug 06, 2017 10:01 am Post subject: |
|
|
One other thing. Ribs that are old tend to be brittle. When separating the ribs from the neck, they tend to shear off near the groove. I have found good results wetting the inside of the rib at the glue joint and let that set like that for a bit. The glue softens and the ribs tend to be more flexible. I would try to then pry the wedges out and then the ribs should come free. I found it best to remove the ribs from the neck before trying to cut it loose from the back, although the cut at the button is better done first before anything else like attempting to remove the ribs.
I would not attempt to separate the neck from the button, but saw it loose as a busted button is more work to repair. Take a fine saw (I use an exacto saw blade in an exacto knife handle), and cut the neck at the button joint parallel to the joint as close as you can to the button without scoring the button straight back to the ribs. Stop the saw before you get to the ribs. This way, when working with the neck and rib assembly, the button is safe.
Others might have a different method that is equally as good.
_________________
Randall Shenefelt |
|
| Back to top |
|
|
Wayland
Junior Member
Joined: 04 Aug 2017
Posts: 13
|
| Posted: Sun Aug 06, 2017 12:49 pm Post subject: |
|
|
| Thanks rs, in this case when I got the fiddle the neck was already broken out bringing with it an inch of rib from either side. some body had already tried to glue it back with some white gunge which hadn't worked then it seems to have been abandoned somewhere damp so most of the rest of it had come unglued and completely fallen apart, the back separated and the top broken all the way down through the "F" hole. When I softened and separated the neck joint I found that the original failure was due to all the short grain sections in the "T" block, One piece had obviously broken in it's manufacture before it even was attached to the fiddle and then been repaired with a tiny dowel showing what a bad design that joint was, I bet they never expected anyone to find that, it made me grin. |
|
| Back to top |
|
|
Dave Chandler
Super Member
Joined: 31 Oct 2007
Posts: 691
Location: Mt Mitchell in North Carolina
|
| Posted: Sun Aug 06, 2017 11:13 pm Post subject: |
|
|
Wayland,
I recently did a neck replacment on an old violin that had this type neck. I took the old neck root out a bit by bit, and put an actual upper block in, then mounted a new neck in the normal manner. Worked out great. Does require taking the top off.
_________________
Dave in the Blue Ridge
Southern Violin Association
"Success is the ability to go from one failure to the next with no loss of enthusiasm" Winston Churchill
"I took the road less travelled, and now I don't know where I am." Marco Polo |
|
| Back to top |
|
|
FiddleDoug
Member
Joined: 08 Sep 2007
Posts: 227
Location: Hilton, NY
|
| Posted: Tue Aug 08, 2017 9:27 am Post subject: Through neck |
|
|
That's not all that uncommon. Typically called a through neck. Sounds like you have a VERY complicated repair. It would typically involve rib doubling for those broken sections, and either re-assembly of the through neck, or trying to convert it to a conventional joint. The glitch that you have converting to a conventional joint is that part of the neck that you need is missing, due to the cut outs that the ribs are set into. In any case, it's an extremely difficult repair, and since you are not a luthier, there will be lots of aspects of this repair that can easily throw thing off enough to make the fiddle unplayable. You'll notice that Dave C. did the repair by putting in a NEW neck (Also very complicated!).
_________________
Doug Wall
www.wallindependent.com |
|
| Back to top |
|
|
Wayland
Junior Member
Joined: 04 Aug 2017
Posts: 13
|
| Posted: Tue Aug 08, 2017 1:50 pm Post subject: |
|
|
| Thanks FiddleDoug, I sensed your concern for the task that I have given to myself and I'm glad that you didn't say "don't try" it which is encouraging. I've already got the top and back together which is probably the easiest part now I'v got to try to put the ribs together some how with a block for the neck and the double ribbing that you suggested, I'll figure something out, it may be unconventional though. You should see my jig for gluing tops. I don't think I will be depriving the violin world of anything precious if I fail but I have confidence, you must be thinking "Ignorance is bliss". |
|
| Back to top |
|
|
Wayland
Junior Member
Joined: 04 Aug 2017
Posts: 13
|
| Posted: Mon Aug 21, 2017 1:51 pm Post subject: Progressing with T through neck joint. |
|
|
| I've managed to reassemble the body of the fiddle, every single bit had become unglued right down to the liners. I decided to make the neck have a conventional joint and put a block in the body to attach it to. It's all gone really well, just a bit too much overhang under the top plate because I only made a rudimentary mold to build the sides into. Using Hyde glue was an education. I still intend to put some pictures on, I thought that the T joint was a rarity but a friend has one with the same joint, you can tell them by looking under the finger board to see if the neck goes into the body, the ones with the T joint ends flush with the outside of the ribs below. |
|
| Back to top |
|
|
FiddleDoug
Member
Joined: 08 Sep 2007
Posts: 227
Location: Hilton, NY
|
| Posted: Mon Aug 21, 2017 8:34 pm Post subject: |
|
|
The big question now is, can you get the neck angles and measurements correct?
_________________
Doug Wall
www.wallindependent.com |
|
| Back to top |
|
|
Wayland
Junior Member
Joined: 04 Aug 2017
Posts: 13
|
| Posted: Sat Aug 26, 2017 12:57 pm Post subject: neck back on. |
|
|
| Well it's all back in one piece. and I tried my best with the neck angle but I think I have set it a bit high making the bridge 37mm in the center, I was worried that it may move down under tension but it stayed rock solid. It doesn't have as much volume on the bass side as I would like and the tone is a little nasal but reasonable considering what it's been through. I suppose I could experiment with the bridge thickness and the sound post and hopefully playing it in will help. The finish has come up really well. Now that it's done I will take some more pics and put them on here. Going to gen up on bridges now. |
|
| Back to top |
|
|
Dave Chandler
Super Member
Joined: 31 Oct 2007
Posts: 691
Location: Mt Mitchell in North Carolina
|
| Posted: Mon Aug 28, 2017 10:04 pm Post subject: |
|
|
That's quite high, presuming 5 clearance over end of fingerboard to strings, sounds like about 33 for fingerboard projection which about 7mm too high. With this much work into it, I'd recommend resetting the neck.
I first thought you might replane the neck's surface for mounting the fingerboard but have to take about 3mm off and thats just too much.
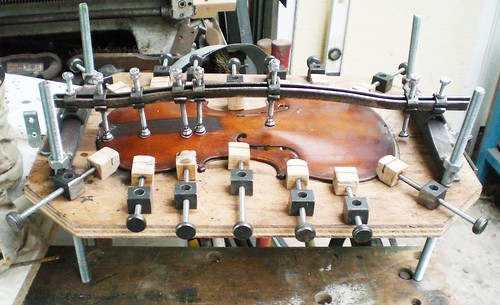
I've set my necks with the fingerboard attached. I hot glue a guide to the top of the fingerboard, that has a spacer at the end that touches the tops surface when the projection is right at 26mm. Makes checking progress easy, and helps align with the center seam on the top.
Here below is a photo of the "stick" just laid on a set up violin, but gives you an idea. I find the center of my fingerboard at the nut and bottom end, and alighn this device and hot glue it onto the fingerboard. It centers the fingerboard and ensures I get the projection right at 26mm.
[img][url=https://flic.kr/p/XA9zoU]
_________________
Dave in the Blue Ridge
Southern Violin Association
"Success is the ability to go from one failure to the next with no loss of enthusiasm" Winston Churchill
"I took the road less travelled, and now I don't know where I am." Marco Polo |
|
| Back to top |
|
|
Wayland
Junior Member
Joined: 04 Aug 2017
Posts: 13
|
| Posted: Wed Aug 30, 2017 4:55 am Post subject: Condition of fiddle as I received it. Testing pic posting |
|
|
| [img]https://www.flickr.com/photos/68680525@N07/36024009970/in/dateposted-public/[/img] |
|
| Back to top |
|
|
Wayland
Junior Member
Joined: 04 Aug 2017
Posts: 13
|
| Posted: Wed Aug 30, 2017 7:05 am Post subject: Wreck in a box |
|
|

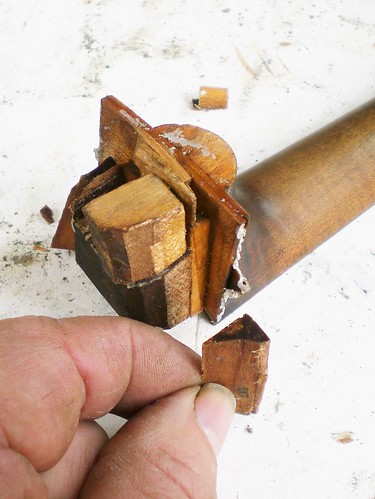
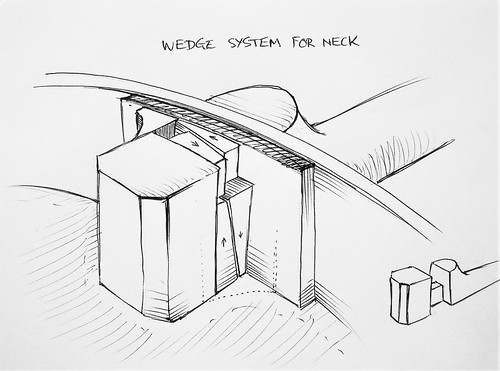
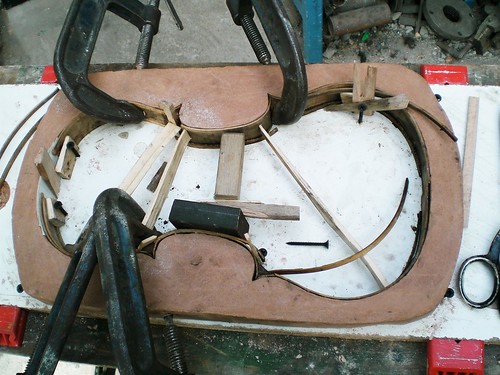
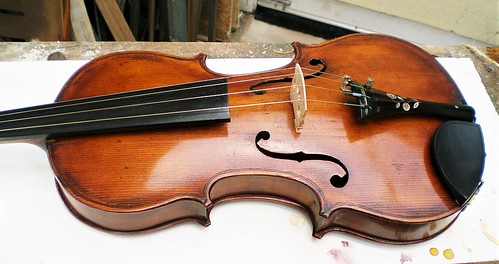
Some of the details of the neck joint structure. I thought it would be interesting to some people who have not come across this before.
Thanks Dave Chandler for the tip but I don't have the heart to take the neck off again.
It's strange how every day the sound improves, it must be drying out and the glue getting harder. It's quite playable now and sounds better than a Chinese fiddle. I've learned a heck of a lot. What next? |
|
| Back to top |
|
|
ollieken
Super Member
Joined: 26 Mar 2007
Posts: 281
Location: New Brunswick Canada
|
| Posted: Wed Aug 30, 2017 9:18 am Post subject: Wayland |
|
|
Wayland You Have done an Amazing job putting life back into a fiddle that most people would have put it in the stove or just left it under the bench .
I Can understand why you don't want to redo the neck It may settle down a bit anyway . Ken |
|
| Back to top |
|
|
|

