| View previous topic :: View next topic |
| Author |
Message |
MANFIO
Super Member

Joined: 11 Apr 2007
Posts: 458
Location: Sao Paulo
|
 Posted: Tue Feb 19, 2008 7:58 am Post subject: Carving a scroll - step by step - or almost!!! Posted: Tue Feb 19, 2008 7:58 am Post subject: Carving a scroll - step by step - or almost!!! |
 |
|
I'm taking some pictures while I'm making my new viola scroll, and I'll put them here with some explanation of the process I use. This is the way I carve my scrolls, others certainly carve them differently. The basic idea is giving some notion about the process I use.
My photo abilities are far from being perfect...
This scroll will be inspired on Andrea Guarneri, from the PRIMROSE viola pictured in Bein & Fushi monograph, but I'll make it without shoulders (that we call "ganasce", in Italian), since many violists don't like them and I want a light scroll also.
I start planning the surface that will receive the fingerboard, here I'm using a RECORD NO. 7 plane with a Japanese laminated blade (the upper side of the block is already paralell):

This is my neck block with the planned upper face. I'm using flamed wood but plain wood is reccomended for begginers, since it's more easy to carve:

Now I'll reduce the neck block to its final thicknesses, that is the maximum width of the scroll, that corresponds to the eyes or last turn, in my case 46 milimeters. Since my block is parallel, I'll use a bandsaw to make two square cuts (with the planned fingerboard side down, facing the bandsaw's table) that will reduce my neck block to 46 mm.
Since the blade will make both cuts square, I'll have no need to square the upper face of my block with the side faces. I'll not touch the side faces with a plane again, since want to keep it square, just the smal circle of the last turn will be be visible when the scroll is finished and I can refinish this small part lager. Working with the plane now would require more time too, and I have to work fast:

Now I'll trace a center line ("mezzeria") in the fingerboard face with this Japanese tool. This line is made by a small knife and wo will be permanent:

Now I'll take a xerox copy (real size) of the side views of my scroll model. I had just one view of this scroll, so I had to make a "negative" drawing of the other side. I find it an easy way to work, because I don't have to make models and I'll make no mistake while transferring the outline to my neck block. Many books (such as Biddulph's on Del Gesù) have both side views of the instruments pictured real size.
I'll aligne, center and glue (hide glue) these copies over my neck block, of course both sides must be perfectly aligned to each other. I apply hide glue also over the paper:

Now I use a template to mark the neck, the neck rood, and a special square to mark the final angle of the neck root:

Since we can't replace cut wood, I'll check all lines prior to cut it, mainly the distance from the fingerboard/upper nut line to the end of the neck line. Bear in mind that you will dovetail the neck to the upper block, so, if your neck length is 150 milimeters (as in my case) you will have to have about 8 milimeters more for the dovetail. I check it visually with one of my instruments:

Double, triple check everything prior to cut it.
This is a view of the neck block with the main lines:

Now I have to rest for a while!!!
_________________
www.manfio.com
http://www.flickr.com/photos/7875988@N02/with/464604020/ |
|
| Back to top |
|
 |
FiddleDoug
Member
Joined: 08 Sep 2007
Posts: 227
Location: Hilton, NY
|
 Posted: Tue Feb 19, 2008 8:58 am Post subject: Great post! Posted: Tue Feb 19, 2008 8:58 am Post subject: Great post! |
 |
|
Instrument making is on my list of list of things to try. One suggestion for your scroll copy/drawing. If you scan the copy into a JPEG file, you can use a program like Adobe Photoshop to flip it and do a mirror image.
Looking forward to further lessons!
Thanks!
_________________
Doug Wall
www.wallindependent.com |
|
| Back to top |
|
 |
MANFIO
Super Member

Joined: 11 Apr 2007
Posts: 458
Location: Sao Paulo
|
|
| Back to top |
|
 |
actonern
Super Member
Joined: 15 Aug 2007
Posts: 444
|
 Posted: Tue Feb 19, 2008 9:40 am Post subject: Posted: Tue Feb 19, 2008 9:40 am Post subject: |
 |
|
| Manfio... I see on the other forum that you make your final/permanent glue-up of fingerboard to neck at this early stage of construction. Aside from the trick of accurately re-indexing the fingerboard for final glue-up after varnishing is complete (as many others do it) is there any other reason you choose this approach? |
|
| Back to top |
|
 |
MANFIO
Super Member

Joined: 11 Apr 2007
Posts: 458
Location: Sao Paulo
|
 Posted: Tue Feb 19, 2008 10:03 am Post subject: Posted: Tue Feb 19, 2008 10:03 am Post subject: |
 |
|
Hi! Yes, in this way I'll have it perfectly aligned, and I'll see the whole thing more organically (we allways see the scroll and the instrument with the glued fingerboard) and that helps me in points like making the transition of the neck to the pegbox, I make the pegbox (near the upper nut) with a "cheek", as in old instruments, that is, the fingerboard gets more narrow in the nut region and then gets a bit wider when the pegbox begins, as we see in many old instruments.
This was caused (in old instruments) because in many cases the fingerboard was wider, so when a narrowner fingerboard was glued, the neck was narrowned too and so the "cheeks" were created.
_________________
www.manfio.com
http://www.flickr.com/photos/7875988@N02/with/464604020/ |
|
| Back to top |
|
 |
actonern
Super Member
Joined: 15 Aug 2007
Posts: 444
|
 Posted: Tue Feb 19, 2008 10:57 am Post subject: Posted: Tue Feb 19, 2008 10:57 am Post subject: |
 |
|
Manfio:
My question was not sufficiently clear. You can do everything you describe if you lightly glue the board on the neck; then remove the board for ease of varnishing.
Don't you find it hard to varnish under the fingerboard with your highly colored varnish? |
|
| Back to top |
|
 |
MANFIO
Super Member

Joined: 11 Apr 2007
Posts: 458
Location: Sao Paulo
|
 Posted: Tue Feb 19, 2008 12:11 pm Post subject: Posted: Tue Feb 19, 2008 12:11 pm Post subject: |
 |
|
Hi! Yes, I could glue it lightly, but these will require the following:
1 - light glueing;
2 - ungluing;
3 - cleaning the glue from the fingerboard and the neck surfaces;
4 - aligning again and regluing.
Four operations (and perhaps one hour of work) instead of just one. And it's easier to fit the neck with the fingerboard attached to it, you have a better idea about neck angle, centering, etc.
We varnish under the fingerboard as we can. We can see this region only when the fingerboard is off. There is a clear tradition in Italian sculpture (Bernini, Donatello, etc) of not refinishing the areas that would remain unseen. Stradivari and Del Gesù did the same. Michael Darnton does the same too.
Now I will cut the outline in a bandsaw. I start cutting the neck root, I use an angle guide to make a precise cut:

I continue cutting, I'm cutting near the line (risky) so that I'll have less work to refine my outline. The "throat" is an important aspect of the style of the maker:

This wood is generous in size, perhaps I'll be able to make a violin scroll with the rest of the wood:


Now I use a big, coarse rasp to take off the saw's marks, it removes wood fast, I have to work quickly:

Here, with a smaller coarse rasp I work on the volute region. I have to keep the rasp flat over the surface to cut uniformly, notice the position of my hands, specially the left hand thumb applying some pressure over the rasp:

_________________
www.manfio.com
http://www.flickr.com/photos/7875988@N02/with/464604020/ |
|
| Back to top |
|
 |
MANFIO
Super Member

Joined: 11 Apr 2007
Posts: 458
Location: Sao Paulo
|
|
| Back to top |
|
 |
MANFIO
Super Member

Joined: 11 Apr 2007
Posts: 458
Location: Sao Paulo
|
 Posted: Tue Feb 19, 2008 1:08 pm Post subject: Posted: Tue Feb 19, 2008 1:08 pm Post subject: |
 |
|
Oooops!!! Prior to glueing the fingerboard I made this:
I traced the middle line all over the scroll. The remains of this line cut with this marking tool can be seen in many instruments of the Italian school.

With dividers I'll mark the position of the fingerboard:

_________________
www.manfio.com
http://www.flickr.com/photos/7875988@N02/with/464604020/ |
|
| Back to top |
|
 |
Chris E.
Junior Member
Joined: 06 Jan 2008
Posts: 11
|
 Posted: Tue Feb 19, 2008 3:00 pm Post subject: Posted: Tue Feb 19, 2008 3:00 pm Post subject: |
 |
|
Thanx for posting this up. I've been looking forward to reading how you do it since you mentioned making this post a while back. It definetly helped clear a few things up.
Great call on the record #7 plane too btw. I happened across one after reading one of your joining posts and decided to grab it. Havent used it for violin making yet, but I test drove it a few times to get familiar with it. A fine tool indeed! |
|
| Back to top |
|
 |
MANFIO
Super Member

Joined: 11 Apr 2007
Posts: 458
Location: Sao Paulo
|
 Posted: Tue Feb 19, 2008 4:56 pm Post subject: Posted: Tue Feb 19, 2008 4:56 pm Post subject: |
 |
|
Well, I changed for photobucket now, let's see if it works.
With the same hot glue I used to glue the fingerboard I size the endgrain of the neck root. If you don't do that, when you glue the neck to the soundbox the glue will penetrate in the endgrain, weaking the glue force:

Now I'll cut the wood from the fingerboard's sides till its end, I'll cut it with my bandsaw, near the line, of course the fingerboard must not be damaged by the saw.

This is what I have now:

Now I'll make the sides of the neck flush with the fingerboard, I'll use a wide gouge to do that initially, a coarse rasp can do that too but, again, don't touch the finished fingerboard:

Here I'm working in the neck root part with a wide Japanese chisel (nomi)

Now I'll trace the circle lines to start removing the wood from the sides of the pegbox. Notice how the back of the soundbox starts with a relative parallel lines and then tapers. Some pegboxes are formed by a continuous tapering of the sides, making them a bit "triangular", I don't like this type of sounbox back, I prefer this type I'm making that is found in the best Italian School:

Photos from photobuccket are being shown cut here...
_________________
www.manfio.com
http://www.flickr.com/photos/7875988@N02/with/464604020/
Last edited by MANFIO on Tue Dec 23, 2008 5:58 am; edited 1 time in total |
|
| Back to top |
|
 |
JWH
Member
Joined: 26 Mar 2007
Posts: 72
|
 Posted: Tue Feb 19, 2008 5:21 pm Post subject: Posted: Tue Feb 19, 2008 5:21 pm Post subject: |
 |
|
| Nice work, once again, Manfio. Yeah, I have read Michael's posts regarding having the fingerboard set before varnishing. I don't do it this way and, yes, there are more operations involved, but with my style of varnishing, I make my final strokes across the instrument, not lengthwise, which would, I should think, make it a bit more difficult to blend in under the board. I guess if you centerline the brush under the board beginning the stroke to the outside, a seam line can't be seen on the slant even if the varnish doesn't quite level perfectly. This probably is a detail not worth worrying about. Thanks for showing your neck layout and technique. John |
|
| Back to top |
|
 |
MANFIO
Super Member

Joined: 11 Apr 2007
Posts: 458
Location: Sao Paulo
|
 Posted: Tue Feb 19, 2008 5:25 pm Post subject: Posted: Tue Feb 19, 2008 5:25 pm Post subject: |
 |
|
Hi John! The underside of the fingerboard is varnished in the way it's possible... if you could see one of my instruments you would not even noticed this feature.
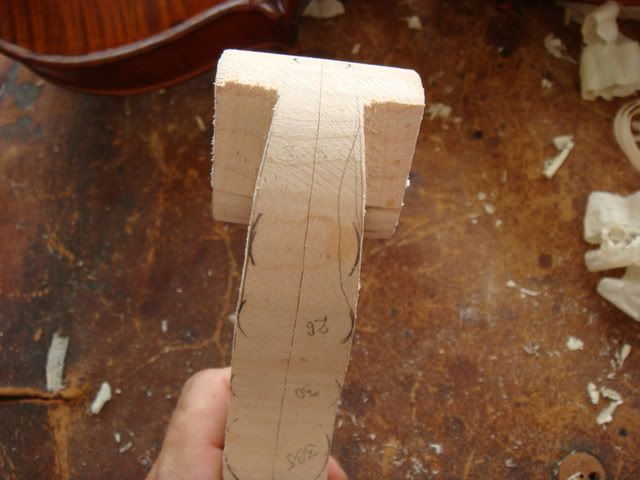
Now, with the fingerboard faced down (and protected by a piece of leather) and with the top of the scroll facing down the table of my bandsaw, I make two cuts following the pegbox lines, take care to don't touch the part of the scroll you are not seeing and is facing the table of the bandsaw. When the cuts are done I have this
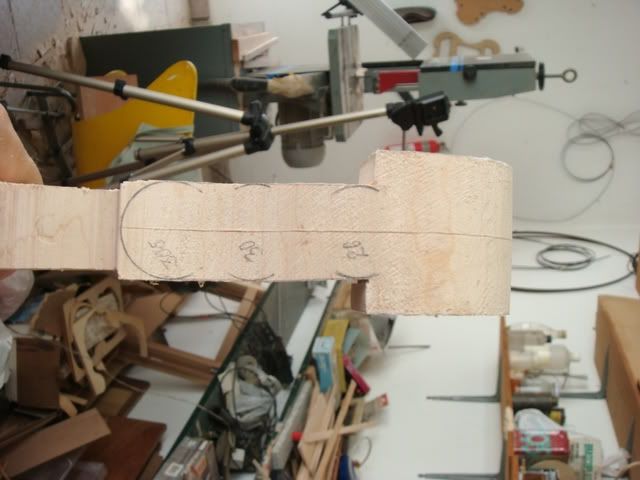
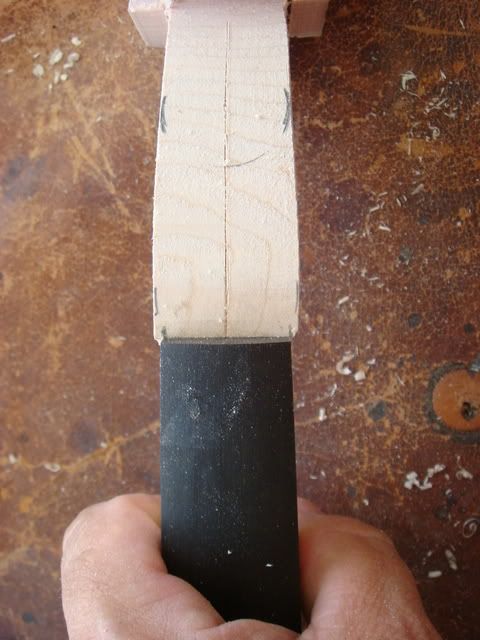
Here the front view. Notice that I left the front side of the pegbox wider than the part in the end of the fingerboard, in order to make it with "cheeks":
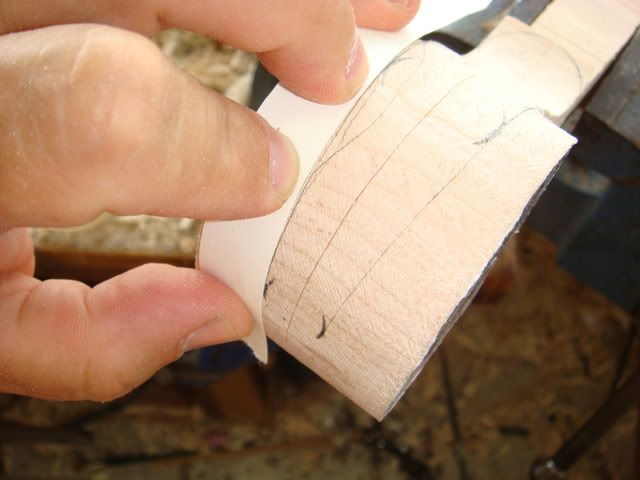
Now I continue tracing circles to mark the limits of my next saw cuts. I conect the outer points of the circles with a line with the help of a piece of paper:
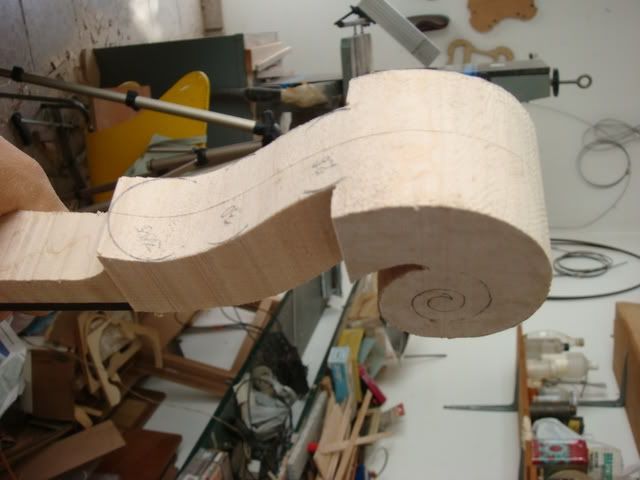
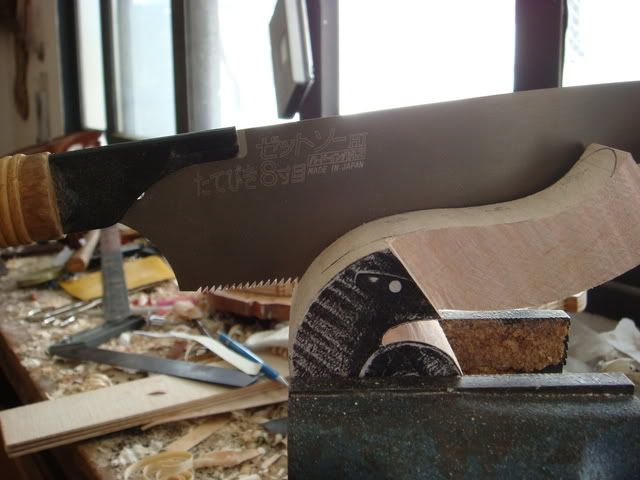
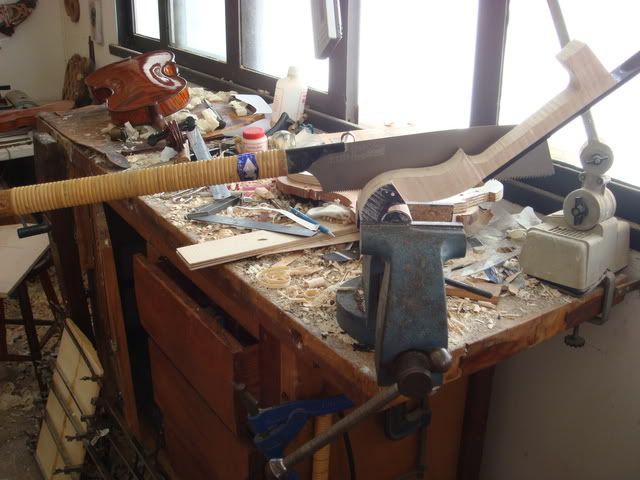
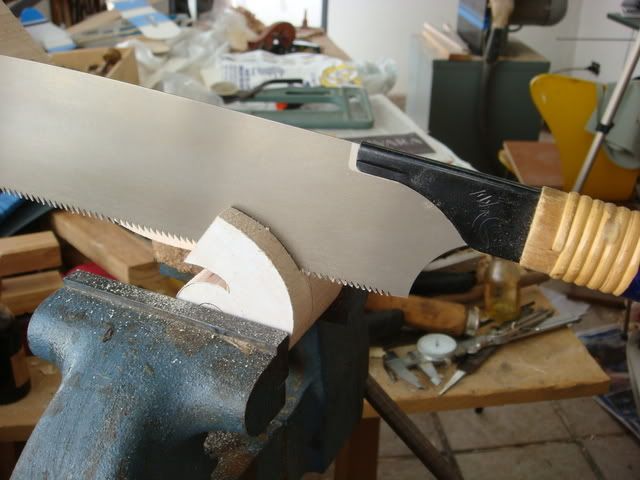
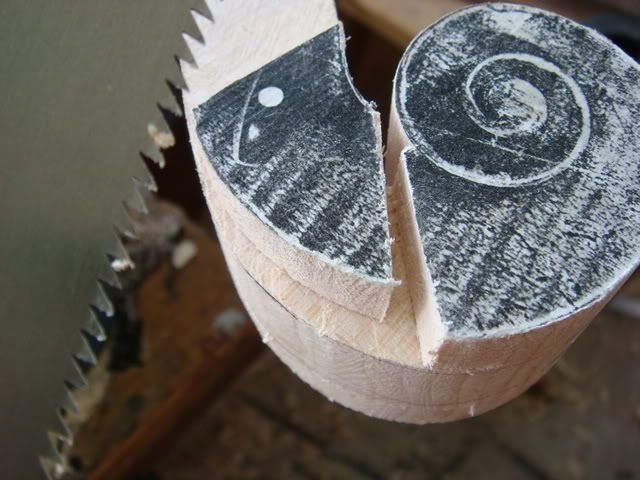
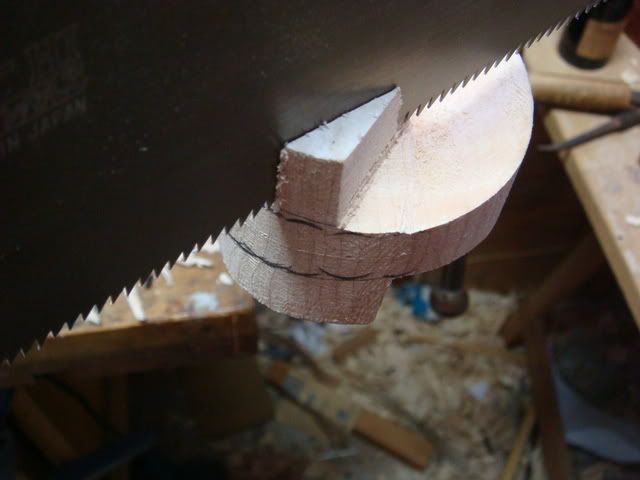
Now with a Japanese saw (I think it's a Dozuki (or Kabata) rip saw) I make the following cuts. Take care again with the scroll beneath. This Japanese saw makes a fine cut, less than one milimeter, much less I think. Notice also how the piece is hold in the vise:
_________________
www.manfio.com
http://www.flickr.com/photos/7875988@N02/with/464604020/ |
|
| Back to top |
|
 |
MANFIO
Super Member

Joined: 11 Apr 2007
Posts: 458
Location: Sao Paulo
|
 Posted: Tue Feb 19, 2008 8:35 pm Post subject: Posted: Tue Feb 19, 2008 8:35 pm Post subject: |
 |
|
Thank you!
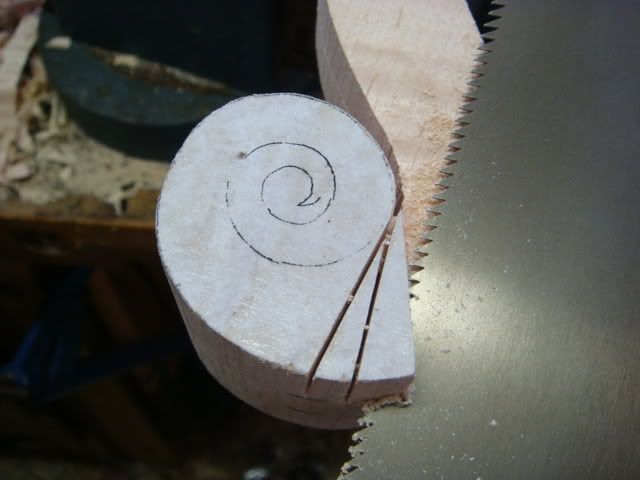
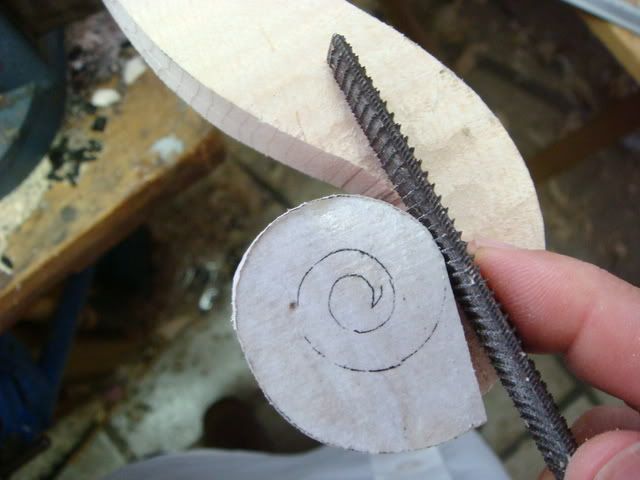
Now I correct the outline of the beggining of the first turn with a rasp:
Now with an almost flat gouge I taper the front face of the pegbox. The pegbox is tapered also from the back to the front side. Some Italian makers made the pegbox (front view) parallel or almost parallel, Del Gesù made some instruments with this feature:
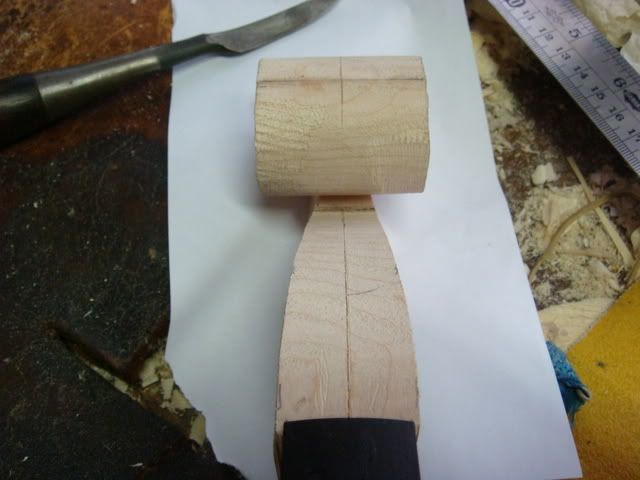
I check the end of the pegbox width, in the root of the scroll (throat), in this case it's about 17 milimeters:
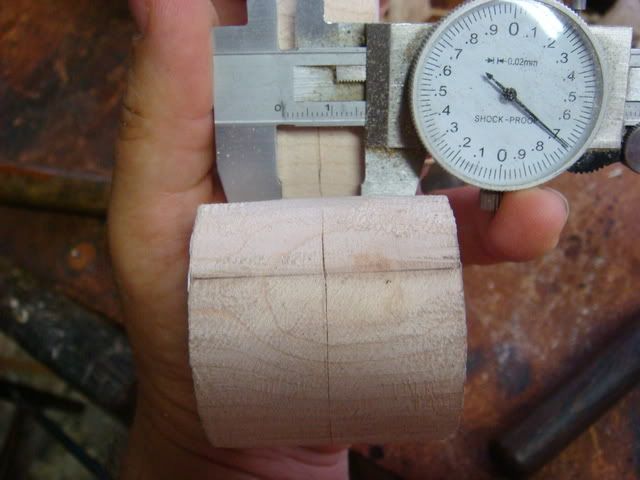
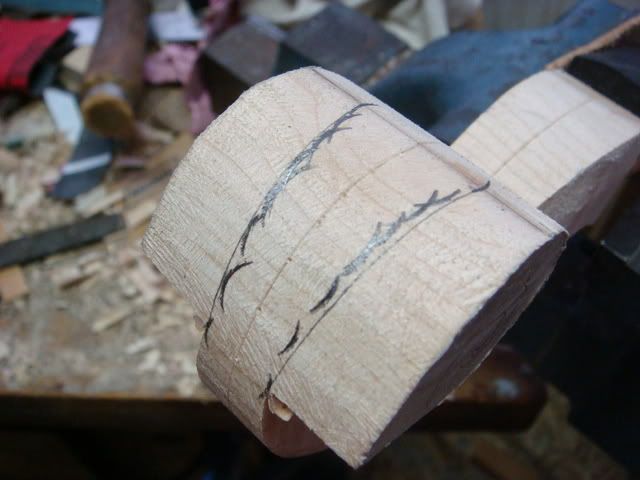
I continue tracing circles to guide my cuts. The scroll measurements can be found in Strad posters and other books, such as Biddulph's on Del Gesù. I'm not following any given measurments to make this one, I'm a bit guided by my eye, but I check sometimes with one of my own scrolls:
I continue cutting with my Japanese saw. The cuts must be made in a square angle, so be sure that your neck block is clamped in a correct position in your vise:
_________________
www.manfio.com
http://www.flickr.com/photos/7875988@N02/with/464604020/ |
|
| Back to top |
|
 |
mapleleaf_gal
Member
Joined: 24 Mar 2007
Posts: 73
Location: tucson, az
|
 Posted: Wed Feb 20, 2008 2:10 am Post subject: Posted: Wed Feb 20, 2008 2:10 am Post subject: |
 |
|
manfio
it is always interresting to see how other people do things! as usual, i love looking at your photos. but i have one question:
do you not make a permant template to do your scrolls? i can post a picture of one if mine, if you like. but i have several different scroll templates that i use. i did the same thing you did with photocopying a scroll head that i liked. then i temp glued (rubber cement) it onto a piece of formica. i then bandsawed and filed it down to final shape. the neck and heel are included in this template. that way i can use it many times over. i drill little holes in the head part to so you can mark the outline of the turns with a pencil. then connect all the dots once you lift the template off.
_________________
http://sgwhiteviolins.googlepages.com/home |
|
| Back to top |
|
 |
|
|
You cannot post new topics in this forum
You cannot reply to topics in this forum
You cannot edit your posts in this forum
You cannot delete your posts in this forum
You cannot vote in polls in this forum
|
Powered by phpBB © 2001, 2005 phpBB Group
|


